 Save
Save My first encounter with guava cheese wasn't at a fancy dessert shop—it was in my grandmother's kitchen on a humid afternoon, where she pulled a deep pink slab from a tin box and sliced it into perfect little squares with the confidence of someone who'd done it a thousand times. The aroma alone stopped me in my tracks: tropical, floral, with just enough tartness to make your mouth water before you even tasted it. She explained that this wasn't really cheese at all, but a treasured Goan confection that transformed humble guavas into something that felt luxurious and almost jewel-like. That day, I learned that the best kitchen magic often comes from patience and the right balance of sweetness and tang.
Years later, I made this for a friend who'd just moved back from Goa, and watching her face light up when she tasted it reminded me why recipes matter—they're little bridges to home, to memory, to moments that shaped us. She ate one piece slowly, then another, and barely said a word, which somehow said everything.
Ingredients
- Ripe guava (800 g, about 4 cups): Choose pink or white varieties that yield slightly to gentle pressure—overripe fruit will cook down faster and taste sweeter, while slightly underripe ones bring welcome tartness to balance the sugar.
- Water (1/2 cup): This helps the guavas break down evenly and ensures they cook through before any edges catch or brown.
- Granulated sugar (450 g or 2 1/4 cups): The amount sounds like a lot, but it's essential for setting—it transforms the fruit into that silky, firm texture that defines real guava cheese.
- Fresh lime juice (2 tbsp): This cuts through the richness and adds a whisper of brightness that keeps the sweetness from feeling cloying.
- Unsalted butter (2 tbsp, plus extra for greasing): Adds a subtle richness and helps create that glossy, luxurious finish.
- Superfine sugar (1/4 cup, optional): A thin dusting of this catches light beautifully and adds a subtle crunch that contrasts with the soft interior.
Tired of Takeout? 🥡
Get 10 meals you can make faster than delivery arrives. Seriously.
One email. No spam. Unsubscribe anytime.
Instructions
- Prepare your pan:
- Butter an 8x8-inch baking pan thoroughly and line it with parchment paper, leaving some overhang so you can lift the finished confection out easily. This step saves you from frustration later.
- Cook the guavas:
- Drop chopped guavas into a saucepan with water and simmer over medium heat for about 15 minutes, stirring occasionally, until the fruit breaks apart easily when you press it with a spoon. The kitchen will fill with a fragrant, almost honeyed aroma.
- Puree until silky:
- Blend the cooked guava until completely smooth, then push it through a fine sieve to catch any stubborn seeds or tough fibers. This step is worth the extra effort—it gives you that refined, jammy texture that makes people pause mid-bite.
- Measure and return to heat:
- You want exactly 2 cups of smooth puree; if you have more, save the extra for another use. Pour it back into a clean, heavy-bottomed saucepan—this is crucial because a thin pan will scorch the bottom before the top is done.
- Add sugar and lime:
- Stir in the sugar and lime juice over medium heat, using a wooden spoon or heatproof spatula. The mixture will seem loose and jammy at first, but don't rush it.
- Stir toward transformation:
- Keep stirring constantly for 30 to 40 minutes as the mixture thickens, darkens slightly, and eventually pulls away from the sides of the pan when you drag your spoon through it. This is where patience becomes your best tool—you'll feel the texture shift under your spoon when it's nearly ready.
- Add the finishing touch:
- Once the mixture is thick and holds its shape, stir in the butter until glossy, then immediately pour it into your prepared pan and smooth the top with a spatula. Working quickly here prevents it from setting unevenly.
- Let it rest:
- Leave it at room temperature for a full hour to cool and firm up completely. This is a good time to make tea or clean up—resist the urge to cut into it early.
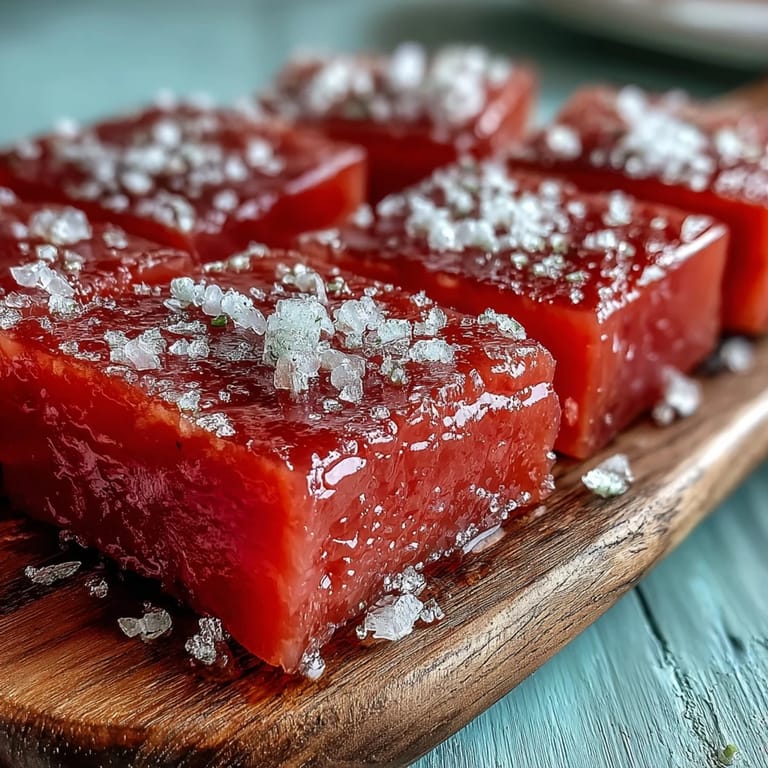
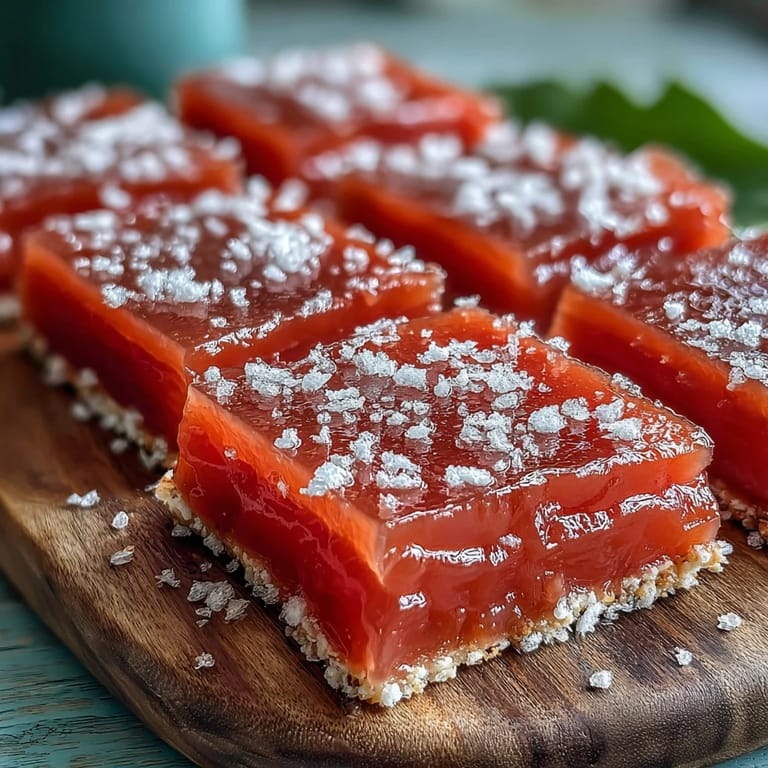
- Cut with precision:
- Once set, lift the slab out using the parchment overhang and cut into 1-inch squares or diamonds with a sharp, lightly greased knife. Wiping your blade between cuts keeps the edges clean.
- Dust if desired:
- Roll the pieces in superfine sugar for a subtle sparkle and delicate crunch that catches on your tongue.
 Save
Save I'll never forget the afternoon my neighbor smelled the guava cooking through our shared kitchen wall and showed up at my door asking what smelled like summer and flowers. We ended up sharing the first batch over tea, and she's been asking for it ever since—which is the highest compliment any recipe can receive.
Texture Talk
The magic of guava cheese lives in how it feels on your tongue: firm enough to cut cleanly, but soft enough to almost melt as you eat it. This balance depends entirely on cooking time and the water content of your guavas—some varieties are naturally juicier than others. If you like a firmer, more candy-like texture, extend the cooking time by a few minutes; if you prefer something softer and more spreadable, dial it back slightly. Trust your senses more than the clock: when the mixture creates deep furrows behind your spoon that slowly fill back in, you're at the sweet spot.
Guava Selection Matters
Pink guavas tend to be slightly sweeter and more fragrant, while white ones bring a delicate floral quality and a touch more tartness. I've made this with both, and honestly, the best choice is whatever looks most fragrant at your market—that's usually the ripest one. Avoid anything mushy or with soft spots, but a guava that yields slightly to pressure is exactly what you want; it means the seeds will be tender and easier to remove after cooking. If your area has limited guava options, frozen guava pulp works beautifully too, though you'll skip the simmering step and go straight to measuring and cooking with sugar.
Storage, Serving & Variations
Once cut and set, guava cheese keeps beautifully in an airtight container at room temperature for up to two weeks, though it rarely lasts that long. Serve it with strong tea, alongside soft cheeses and crackers, or tucked into a dessert platter where it catches the light and gleams like a jewel. Some people like to brush the finished pieces with a touch of honey or a light coating of cocoa powder, while others press a whole clove into the center of each piece before the mixture fully sets.
- If you want to go fancy, layer the guava cheese between thin wafers or crackers for an unexpected textural contrast.
- A tiny piece alongside a slice of creamy cheese—like a mild brie or fresh ricotta—creates a beautiful balance of sweet and savory.
- Store extras in the freezer for up to three months and thaw at room temperature when you want to impress someone without effort.
 Save
Save This recipe is proof that the simplest ingredients, treated with patience and respect, become something far greater than the sum of their parts. Make it once, and you'll find yourself making it again, each time discovering something new in the process.
Questions & Answers
- → What makes this sweet uniquely Goan?
This confection reflects Goa's Portuguese-influenced culinary heritage, where tropical fruits like guava are transformed into dense, fudgy sweets through slow cooking. The combination of fruit puree, sugar, and butter creates a texture similar to firm dulce de leche or membrillo, making it distinctly characteristic of Goan dessert traditions.
- → Can I use white guava instead of pink?
Both pink and white guava varieties work beautifully. Pink guava yields a vibrant ruby color, while white guava produces an amber-toned sweet. The flavor profile remains similar, though pink guavas tend to be slightly more aromatic. Choose based on visual preference or availability in your region.
- → How do I know when the mixture is ready?
The mixture is properly cooked when it thickens noticeably, begins pulling away from the sides of the pan, and forms a mass that holds its shape when stirred. It should appear glossy and very thick—similar to the consistency of thick fudge or firm cookie dough. A test: drop a small amount on a plate—it should set without spreading.
- → Why add butter at the end?
Butter is added toward the end of cooking to enrich the flavor and create a smooth, glossy finish. The fat content helps prevent the sugar from crystallizing, ensuring a velvety texture rather than a grainy one. It also adds subtle richness that balances the bright fruit flavors.
- → How should I store this confection?
Store the cut pieces in an airtight container at room temperature for up to 2 weeks. The high sugar content acts as a natural preservative. For longer storage, refrigerate for up to a month, though bring to room temperature before serving for the best texture. If dusted with sugar, the coating may dissolve slightly in humid conditions.
- → Can I make this dairy-free?
Yes, substitute the unsalted butter with high-quality vegan butter or coconut oil. The texture and setting properties remain similar, though coconut oil may impart a very subtle coconut flavor. Ensure the substitute is solid at room temperature to maintain the firm, sliceable consistency of the finished confection.