 Save
Save The pastry chef at the café where I used to work would make these every winter when blood oranges flooded the market. I'd watch her brush honey glaze over those ruby slices, and the way the light caught them made me want to learn pastry just to recreate that moment. Now my own kitchen smells like butter and vanilla every January, and I've stopped buying dessert anywhere else.
I brought these to a dinner party once, still warm from the oven, and my friend's mother asked if I'd trained in Paris. I hadn't, but I didn't correct her right away. There's something about a homemade tart that makes people assume you've got secrets, when really it's just cold butter and patience.
Ingredients
- All-purpose flour: The backbone of the tart shell, and using cold butter with it creates those flaky layers that shatter perfectly under a fork.
- Powdered sugar: Sweetens the dough without adding graininess, and it helps the crust brown evenly in the oven.
- Unsalted butter, cold and cubed: This is non-negotiable for flakiness; warm butter makes the dough greasy and tough instead of tender.
- Egg yolk: Adds richness and binds the dough just enough without making it dense.
- Ice water: Brings the dough together without activating too much gluten, which keeps the crust from getting chewy.
- Whole milk: The base of the custard, and using whole milk instead of skim makes it silky instead of watery.
- Granulated sugar: Sweetens the custard and helps it set properly when combined with the cornstarch.
- Egg yolks: These thicken the custard and give it that pale yellow color and luxurious texture.
- Cornstarch: Stabilizes the custard so it holds its shape when you slice into the tart, no puddles.
- Pure vanilla extract: A teaspoon transforms the custard from plain to aromatic, and it balances the citrus beautifully.
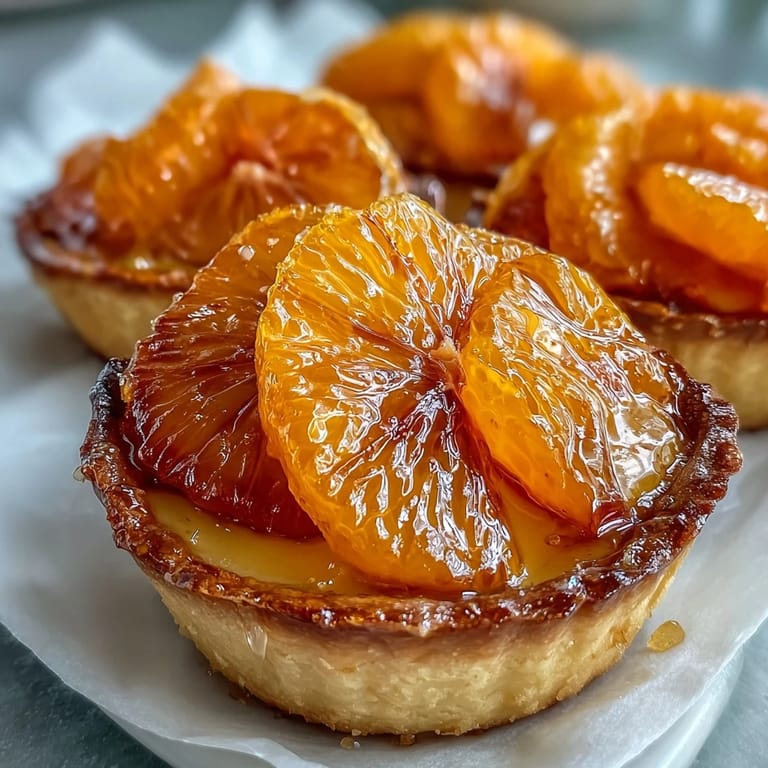
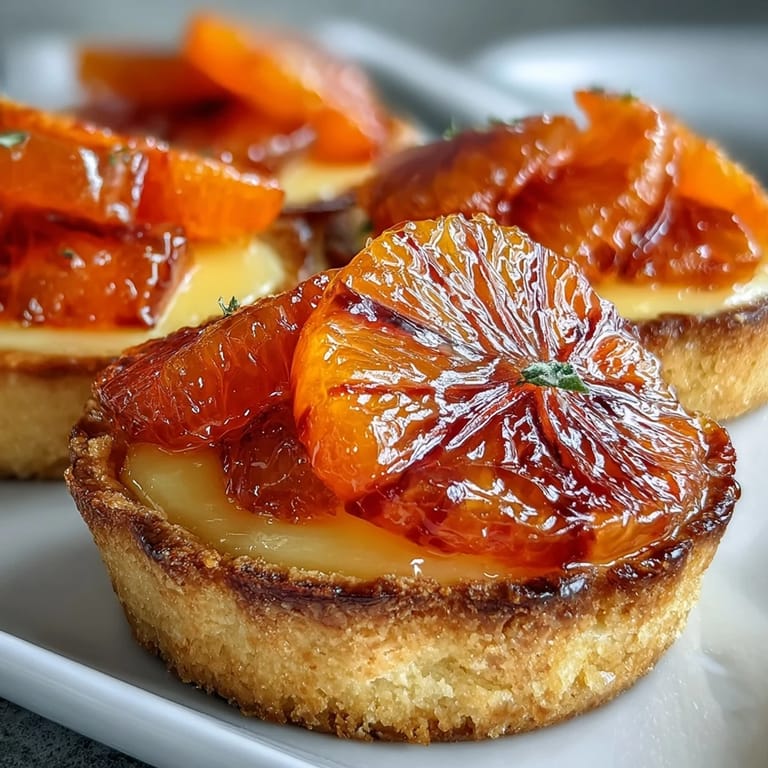
- Blood oranges: The star of the show, with their deep red flesh and tangy sweetness that makes regular oranges look boring.
- Honey: Optional but worth it for that glossy finish and subtle floral note that enhances the fruit.
Tired of Takeout? 🥡
Get 10 meals you can make faster than delivery arrives. Seriously.
One email. No spam. Unsubscribe anytime.
Instructions
- Mix the tart dough:
- Pulse the flour, powdered sugar, and salt in your food processor, then add the cold butter cubes and pulse until it looks like wet sand. Add the egg yolk and a tablespoon of ice water, pulsing just until the dough starts to clump; you want it crumbly, not smooth.
- Chill the dough:
- Press the dough into a flat disk, wrap it tightly in plastic, and refrigerate for at least an hour. This rest time lets the gluten relax and the butter firm up, which prevents shrinking when you bake.
- Roll and shape:
- On a floured surface, roll the dough to about 1/8-inch thick, then cut circles large enough to fit your tart pans with a little overhang. Press gently into each pan, trim the edges, and chill again for 20 minutes so they hold their shape in the oven.
- Blind bake the shells:
- Line each shell with parchment, fill with pie weights or dried beans, and bake at 350°F for 15 minutes. Remove the weights and parchment, then bake another 5 minutes until golden and crisp.
- Make the custard:
- Heat the milk until it's steaming but not boiling, then whisk together the egg yolks, sugar, and cornstarch in a separate bowl until pale. Slowly pour the hot milk into the yolk mixture while whisking, then return everything to the saucepan and cook over medium heat, whisking constantly, until it thickens and bubbles.
- Finish the custard:
- Once thickened, remove from heat and stir in the vanilla and butter until smooth. Cover the surface with plastic wrap to prevent a skin from forming, then let it cool to room temperature before chilling for at least an hour.
- Assemble the tarts:
- Spoon the chilled custard into each cooled tart shell, smoothing the top gently. Arrange the blood orange slices in overlapping circles on top, pressing them lightly into the custard.
- Glaze and serve:
- If you want that professional shine, warm the honey and water together and brush it over the oranges. Chill the finished tarts until you're ready to serve, and they'll stay beautiful for hours.
 Save
Save My neighbor saw me photographing these on my kitchen counter one afternoon and asked if I was starting a bakery. I wasn't, but the idea didn't sound as crazy as it once did. There's something about pulling off a dessert this pretty that makes you believe you're capable of more than you thought.
Choosing Your Blood Oranges
Not all blood oranges are created equal, and I learned this the hard way after buying a bag of pale, flavorless ones at the grocery store. Look for fruit that feels heavy for its size and has a slight give when you squeeze it. The skin color doesn't always match the flesh, so don't worry if they look like regular oranges on the outside. Peak season is January through March, and that's when you'll find the deepest color and best flavor.
Making the Custard Foolproof
The first time I made custard, I walked away to answer the door and came back to a pan of sweet scrambled eggs. Now I keep the heat at medium and never stop whisking once the milk goes in. The cornstarch is your safety net here, it's much more forgiving than a traditional egg custard and still gives you that luxurious texture. If you do see a few lumps, push the custard through a fine mesh strainer before chilling, and no one will ever know.
Storing and Serving
These tarts are best the day you assemble them, but I've made the shells and custard a day ahead and kept them separately in the fridge. The shells stay in an airtight container at room temperature, and the custard needs to be covered tightly so it doesn't pick up any fridge odors. Assemble them a few hours before serving, and they'll still look and taste bakery-fresh.
- If you're transporting them, leave the orange slices off until you arrive and arrange them on-site.
- Leftover custard is perfect for filling cream puffs or spreading between cake layers.
- Don't freeze these, the custard weeps and the crust gets soggy when thawed.
 Save
Save Every time I make these, I remember that pastry chef and the way she moved around the kitchen like she had all the time in the world. Maybe that's the real secret: treating something this beautiful like it's not a big deal at all.
Questions & Answers
- → Can I make these tarts ahead of time?
Yes, the tart shells and custard can be prepared up to a day in advance. Store shells at room temperature in an airtight container and custard covered in the refrigerator. Assemble with fresh blood orange slices just before serving for optimal texture and presentation.
- → What if I can't find blood oranges?
Regular oranges, Cara Cara oranges, or even tangerines work beautifully as substitutes. While you'll lose the dramatic red color, the flavor and texture will still be delicious. You can also use a mix of citrus for visual variety.
- → How do I prevent the tart shells from shrinking?
Chilling the dough thoroughly before and after rolling is essential. The 20-minute chill after fitting the dough into pans allows the gluten to relax and prevents shrinkage during baking. Using pie weights also helps maintain the shape.
- → Can I use store-bought tart shells?
Absolutely. High-quality pre-made tart shells save time and still produce excellent results. Simply prepare the custard and arrange the blood oranges as directed. This shortcut makes the dessert much more accessible for busy schedules.
- → How thick should I slice the blood oranges?
Aim for slices about 1/8 to 1/4 inch thick. This thickness allows them to be flexible enough to arrange attractively while still maintaining structure. Use a sharp knife and remove any seeds before arranging on the custard.
- → How long will these tarts stay fresh?
Once assembled, the tarts are best enjoyed within 24 hours. The pastry will begin to soften from the custard moisture over time. If you need longer storage, keep components separate and assemble shortly before serving.